Have you ever wanted to organize your digital files in a way that makes it easy to find what you’re looking for? Well, you’re in luck! Today, we’re going to talk about how to create your very own folder. By the end of this article, you’ll be equipped with the knowledge and skills to structure your files in a way that suits your needs.
Creating a folder is a simple yet effective way to keep your files organized. Whether you’re dealing with documents, photos, or any other type of file, having them neatly arranged in folders can save you a lot of time and frustration. To create a folder, all you need to do is right-click on an empty space on your desktop or file explorer, select “New,” and then choose “Folder” from the drop-down menu. You can then name your folder whatever you like, whether it’s “Work,” “Photos,” or “Recipes.” Within each folder, you can create subfolders to further categorize your files, making it even easier to navigate and locate specific items. So, get ready to take control of your digital clutter and stay tuned as we dive deeper into the art of folder creation.

Table of Contents
Understanding the Importance of Organizing Files
Why organizing files is crucial
In today’s digital age, we are inundated with files and data on a daily basis. Whether it’s work documents, personal photos, or important records, we constantly need to manage and organize these files to ensure easy access and efficient workflows. Without proper organization, finding a specific file can be a time-consuming and frustrating task. This is where creating your own folder becomes crucial.
The benefits of creating your own folder
Creating your own folder allows you to have control over the organization and structure of your files. Instead of relying on default file locations or cluttered desktops, your own folder gives you the freedom to categorize and arrange files in a way that makes sense to you. This not only improves your productivity but also reduces the risk of losing important files.
Deciding on the Purpose of Your Folder
Identifying what type of files you want to organize
Before creating a folder, it’s important to identify the type of files you want to organize. Are they work-related documents, personal photos, or a mix of both? Understanding the nature of the files will help you determine the best way to structure your folder.
Determining the goal or objective of your folder
Once you have identified the type of files, it’s important to determine the goal or objective of your folder. Are you trying to improve efficiency by categorizing files based on projects or topics? Or do you simply want to have a central location for all your files? By determining the goal, you can create a folder structure that aligns with your needs.
Choosing the Right Folder Structure
Exploring different folder structures
There are several folder structures you can choose from, depending on your needs. One common structure is the hierarchical structure, where you have main folders as categories and subfolders within each category. Another option is the categorical structure, where you have different folders for each category without any subfolders. The choice of structure will depend on the number of files and the level of organization required.
Considering hierarchical and categorical arrangements
When deciding between hierarchical and categorical arrangements, it’s important to consider the pros and cons of each. The hierarchical structure allows for more detailed organization and easier navigation through subfolders. On the other hand, the categorical structure offers simplicity and quick access to files within specific categories. Choose the arrangement that suits your needs and preferences.
Creating a Folder on Windows
Accessing the File Explorer
To create a folder on Windows, you first need to access the File Explorer. You can do this by clicking on the folder icon in the taskbar or by pressing the Windows key + E.
Right-clicking to create a new folder
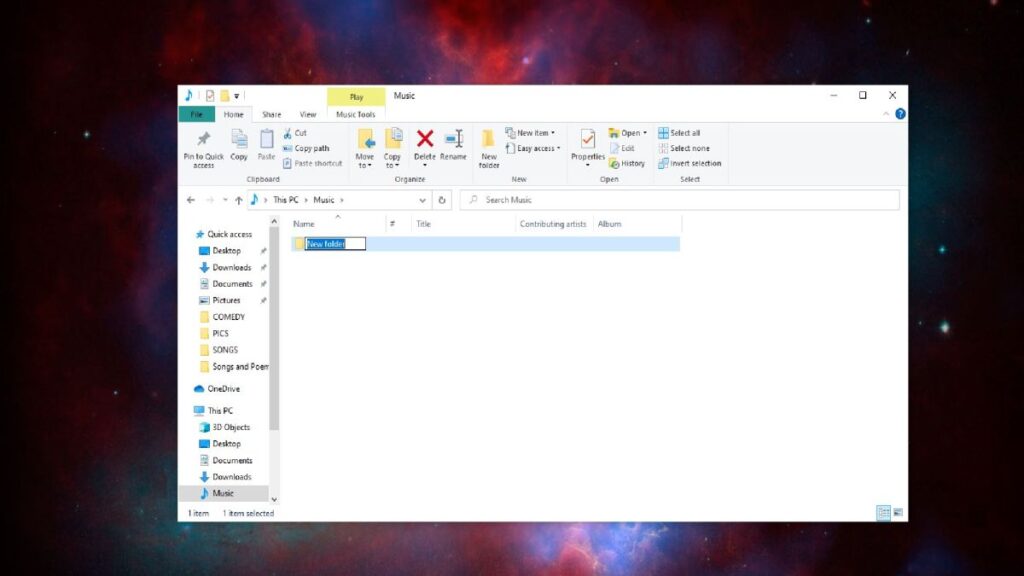
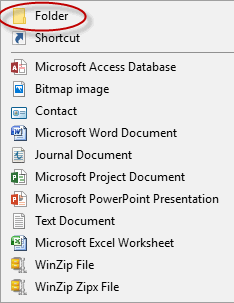
Once you are in the File Explorer, navigate to the desired location where you want to create your folder. Then, right-click on an empty space and select “New” from the context menu. Finally, choose “Folder” from the submenu to create a new folder.
Giving your folder an appropriate name
After creating the folder, it’s important to give it an appropriate name that reflects its purpose or content. Avoid using generic names and instead opt for descriptive names that will make it easier to locate the folder in the future.
Creating a Folder on Mac
Using Finder to navigate to the desired location
To create a folder on a Mac, you can use the Finder application. Open Finder by clicking on the smiley face icon from the dock or by pressing Command + Space and typing “Finder” in the search bar.
Selecting ‘New Folder’ from the ‘File’ menu
Once you have opened Finder, navigate to the location where you want to create your folder. Then, click on the “File” menu at the top of the screen and select “New Folder” from the dropdown menu. This will create a new folder in the selected location.
Renaming your folder for clarity
After creating the folder, it’s important to rename it to ensure clarity and easy identification. Similar to creating a folder on Windows, use a descriptive name that accurately represents the purpose or contents of the folder.
Organizing Files within Your Folder
Understanding the importance of file naming conventions
As you start organizing files within your folder, it’s crucial to establish a consistent file naming convention. Use clear and descriptive names that indicate the content or purpose of the file. Additionally, consider including dates or version numbers to keep track of file revisions.
Categorizing files into subfolders
To further organize your files, consider creating subfolders within your main folder. Categorize files based on projects, clients, or any other relevant criteria. This will help you easily navigate through the files and locate specific documents when needed.
Arranging files based on frequency of use
An additional organizing strategy is to arrange files based on the frequency of use. Place frequently accessed files at the top-level of your folder, while lesser-used files can be placed in subfolders or towards the bottom. This will optimize your workflow and save time searching for commonly used files.
Adding and Managing Files in Your Folder
Drag and drop method
Adding files to your folder can be done through the simple drag and drop method. Open the folder where you want to add files and locate the files on your computer. Click and hold onto the files, then drag them over to the folder and release the mouse button. The files will then be copied into your folder.
Copying and pasting files into your folder
Alternatively, you can copy and paste files into your folder. Select the files you want to copy, right-click, and choose “Copy”. Then, navigate to your folder, right-click, and choose “Paste”. This will create copies of the files within your folder.
Deleting and moving files within your folder
To delete files within your folder, simply select the files you want to remove and press the “Delete” key on your keyboard or right-click and choose “Delete”. If you want to move files to a different location within your folder or to another folder altogether, you can drag and drop them or use the cut and paste method.
Enhancing Your Folder with Metadata
Understanding the concept of metadata
Metadata refers to additional information about a file that helps provide context and improve searchability. This includes tags, descriptions, and keywords that are associated with the file. Adding metadata to your files can significantly enhance the organization and retrieval of your documents.
Adding tags, descriptions, and keywords to improve searchability
To add metadata to your files, you can right-click on a file, select “Properties” or “Get Info”, and navigate to the appropriate section where you can add tags, descriptions, and keywords. Use relevant and descriptive terms to ensure easy searching and filtering of your files.

Maintaining and Updating Your Folder
Regularly reviewing and organizing files
Once you have created and organized your folder, it’s important to regularly review and maintain it. Set aside time on a weekly or monthly basis to go through your files, delete outdated or unnecessary files, and ensure that everything is still organized in a way that makes sense to you.
Deleting outdated or unnecessary files
As you review your files, be ruthless when it comes to deleting outdated or unnecessary files. Holding onto unnecessary files not only takes up valuable storage space but also adds clutter to your digital workspace. Remove anything that no longer serves a purpose or is outdated.
Backing up your folder for data security
Lastly, it’s crucial to back up your folder on a regular basis to ensure the security of your files. This can be done by using an external hard drive, cloud storage, or an online backup service. By creating backups, you can protect your files from hardware failures, accidents, or other unforeseen events.
Conclusion
Creating your own folder is a simple yet effective way to improve the organization of your files and boost your productivity. By understanding the importance of organizing files, determining the purpose of your folder, choosing the right folder structure, and following the steps to create and manage your folder, you can ensure easier access, enhanced searchability, and a clutter-free digital workspace. Apply the knowledge gained from creating your own folder to other digital organization tasks, and experience the benefits of a well-organized and efficient workflow.
